Be sure and check out my shop for a sweet summer sale!

Thursday, January 28, 2010

My favorite pizza recipe!

Turkey Sausage and Mushroom Pizza
This is one of my family's favorite meals. I don't like to toot my own horn (HONK!), but anytime I've ever made this for a party, I am handing out the recipe!
 You can make many variations, but this is how I usually make it.
You will need:
2-3 Italian turkey sausage links, squeezed out of casing and browned
2 cups of shredded mozzarella cheese
sliced mushrooms ( kind & quantity depends on what you like!)
1-2 tbsp capers
2 garlic cloves, pressed
2 tbls olive oil
1 tsp oregano
Premade pizza crust (I prefer "Mama Mary's", but you can use pizza dough or Boboli bread also)

Preheat your oven to 425 degrees.  Mix all ingredients together in a bowl and put onto your crust.  Bake for 12 to 15 minutes depending on how crispy you like your crust.

Sometimes I will make this without the meat and mushrooms and put fresh tomato and basil on it.  It's great with sundried tomatoes also!  I hope you enjoy it!


Wednesday, January 27, 2010

Pizza pan chore board-DIY

My six year old has asked me several times to make her a "chore chart".  I've tried, with just some paper on the computer, but we never seem to keep up with them.  I have seen the CUTE calendars that people have made using cookie sheets and have wanted to try and make one.  Then today, as I thought of merging the two ideas!  This is what I came up with!

I started with a pizza pan that I used to use for something other than pizza.

Then, I covered it with some scrapbook paper and added some chipboard letters and flowers.


Notice, I had some of the pan showing on the top and bottom, so I added some ric rac around the outside.  Then, I just glued strips of paper with things she needs to do each day onto magnets.  I added the two little frames with "to do's" and "done" so that she could move the chore from to do to done herself!  She helped out a little bit and thought that was fun.  You could do this on a cookie sheet too and put more than one child on it!  I just used all stuff I already had around the house, so I didn't have to put out any more money!


Now, I'm gonna put that kid to work.

Does anyone else feel like this?


I sure do!

Tuesday, January 26, 2010

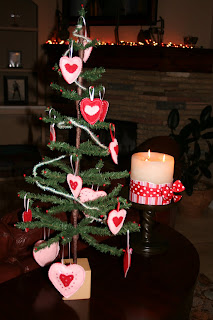
It's a love tree!

Well since we took down our Christmas decorations, the house has looked so bare!  I've been seeing all these great Valentine decoration ideas on blogs and thought I would get started with some of my own. 

I knew as soon as we took down the tree, I wanted to make some heart ornaments for a "love tree"!  I finally got them done this weekend. 


So, all I did was cut out some felt hearts with my pinking shears in some different sizes.  I tried to glue them together with a little stuffing, but the glue didn't work out.  So I sewed them together on my machine.  (I'm not much for hand work!)


Then my daughter and husband put the rhinestones on some of them!  Daddy was into the whole thing!  He even got out some of the lights from Christmas and put them on the mantle!

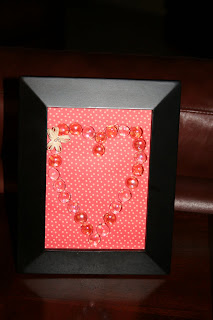
So, I got this idea from Jen over at Tatertots and Jello.  (awesome blog, you should check her out.  She even has a giveaway going on right now!)  She did X's and O's, but I will have to rob some frames from elsewhere in the house to add to this.


This is just scrapbook paper with some floral gems! 

Then I just added a big candle with some scrapbook paper and a bow!  I saw this idea on Lemonade Makin' Mama's blog.


So, this is what the table looks like so far!  You can see the lights in the background.  I plan to add a banner to the mantle and I have some cute blocks on the way that I won in a giveaway!  I'll take a pic and let you know where to get your own!

I would have posted sooner, but I have been busy making these...


It's hard to see in the picture, but there are close to 100 little rhinestones on the "h".  I still have some more to make, and I just bought a bunch on tshirts, so I'll be putting them in my shop soon.  I also just got loads of flip flops, so order away!  (I know, I am shameless)

Have a great Tuesday everyone!

And Happy Birthday Alex!


Saturday, January 23, 2010

And The Winner Is...

My very first giveaway was a lot of fun!  Thanks for all who entered, I am so happy that more than 2 people decided to play along!  If you didn't win, be sure to check out my esty shop, you can still get some sassy feet for flip flop weather! 

Ok, so the winner is GAY!  from It's a Hodgepodge Life!  I emailed you Gay, so let me know your size and address, because I know it's warm enough for flip flops at your house!

Have a great Saturday!

Friday, January 22, 2010

The flip flop giveaway ends tonight at midnight, so if you would like to enter, go here.

Thanks for stopping by!

Thursday, January 21, 2010

Us Texas girls gotta stick together!

I have met a new bloggy friend named Gay. She's from Texas too, only it probably takes 8-10 hours to drive to her house from mine. Maybe someday we'll meet up. For now, we just "follow" each other.

Gay is getting close to her 50th follower! She's holding a giveaway that I am sure you would want to know about.

This cute necklace (that she made herself) is the prize!


So, head on over to It's a Hodgepodge Life and enter the giveaway! 

And if you'd like to enter my giveaway...there's still time!


Monday, January 18, 2010

Ribbon covered hanger tutorial

This is a really easy project to fancy up some hangers for a gift or a special outfit! It's a nice touch to add to a piece of clothing you may have sewn for someone as a gift as well. These cost very little to make. You will need:
1. Plastic hangers (I used a children's size) If they have the little hook on them, twist or cut it off.
2. Tape
3. Glue gun
4. Plastic grocery bags, I used 4
5. Ribbon of your choice, about 3 yards for children's hanger

Starting at the neck of the hanger, tape a corner of the bag to the hanger and start wrapping it all the way around. You will need to make sure to make it kind of bulky, but keep it as even as possible.


Once you've covered the hanger with the bags, put some glue at the top and begin to wrap your ribbon around.


Once you've gone all the way around, go past where you began to be sure and cover all of the bag.


Glue it into place. You are almost done!


Make a bow or just tie together several pieces of ribbon and glue over the neck where you left off with your ribbon.


That's it, you have a special little hanger!


I made these for my daughter for her birthday a couple of years ago. She was very excited as she had always admired the padded hangers in my closet.


Have fun!

I'm linking up with Kimba's DIY day!

and
Show and Tell Green


If you would like to enter my giveaway for some sassy flip flops, go here. UPDATE--GIVEAWAY CLOSED


Saturday, January 16, 2010

Counting my blessings

As I ponder what to post next, I have had a hard time getting the visions of the Haiti earthquake aftermath out of my head. Last night I stayed up past midnight watching CNN. It is all so heartbreaking.

I realize that sometimes I forget how truly blessed I am. I realize I am so spoiled! I have a wonderful husband, great kids, a comfortable place to live, food to eat, clothes to wear...I could go on and on. But first and foremost, we are together and we are healthy, we are well. The things that seem so miniscule that we take for granted on a daily basis, now seem so big and wonderful in comparison to those going through a living hell in Haiti.

My heart breaks for all those who are mourning family members and friends, all those who are hurt and unable to get treatment, all those who don't know where their friends and family are and those who know where they are buried and can't get them out.

I pray for all of them.

And as I go through the hustle and bustle of my day, rushing to birthday parties and wiping noses, I thank the Lord for my blessings.

Here are some of them. They are what keep me going and bring a smile to my face. I am hugging a little bit harder and kissing a little bit more.


I had to include the dog in my blessings! She's our "first born" and we need her as much as she needs us.
Today I hope you are blessed.
Have a good weekend!

p.s. If you would like to enter my giveaway, just scroll to the next post for details!

Wednesday, January 13, 2010

It's Time For a Giveaway! CLOSED

The Freckled Bug's First Giveaway! I have been looking forward to today! I would like to give away one pair of my sassy flip flops to one of my readers! Here are some of the flip flops I already have made up. The pair the winner will receive will depend on what size you need. The giveaway will remain open until next Friday, January 22, 2010, midnight central time! Here is how you can enter:


1. Visit my shop and leave a comment telling what item strikes your fancy.


2. Go to the right sidebar and follow me! Leave me a comment telling me you did so. If you are already a follower, leave me a comment telling me that you are!


3. Blog about the giveaway with a link to me and come back and leave me a comment letting me know.


Winner will be picked by Random.org. Check back to find out who the winner is on Saturday, January 23, 2010.

Happy entering! I hope more than 2 people enter, because that would just be sad.


I can't stop eating the Puppy Chow!


No, it's not dog food. Some people call it other things, like Muddy Buddy, but in these parts it goes by Puppy Chow. Yeah, sounds gross, but I think it's almost the best treat in the world. Right now anyway. It usually comes out around the holidays and once it's gone it's gone. But I have had a hard time shutting my mouth lately and continue to shovel in the food! This morning I realized that I am jonesing for the chow and needed to make one more batch. After this, I promised myself, THAT'S IT!

If you would like the recipe, go here.
Enjoy!

Be sure to come visit tomorrow for my first GIVEAWAY!

Monday, January 11, 2010

I Feel Like Chicken Tonight!

Ok, so my oldest daughter has some kind of a dairy allergy. We aren't exactly sure what it is, she hasn't been tested yet, but she gets sick anytime she eats food with milk or cheese in it. At first we thought it was lactose intolerance and then realized it was much more. My husband enjoys casseroles, which usually include cheese, milk or cream of something soup, so those are becoming a thing of the past. Some of my old "go to" recipes can be done with soy milk and veggie cheese, but some of them are just not the same.

So what I am getting at here, is that I have some new recipes to share! The first comes from Martha Stewart's "Everyday Food" magazine. I don't have a picture because we ate it all!!!

So, here it is BAKED CHICKEN WITH ONIONS, POTATOES, GARLIC AND THYME!

Serves 4, prep time 10 mins., total time 1 hour

1 whole chicken (3-3 1/2 lbs) cut into 8 pcs and breast halved crosswise
1 lb white new potatoes, halved (quartered if large)
1 large red onion, cut into eighths
1 head garlic, cloves separated and left unpeeled
6 sprigs thyme
1 lemon quartered
1/4 cup extra virgin olive oil (evoo)
2 tbls balsamic vinegar
coarse salt and ground pepper

Preheat oven to 450. Arrange chicken through lemon in a 12X16" roasting pan. Whisk together evoo and vinegar and drizzle over chicken. Toss to combine and season with salt and pepper. Turn chicken skin side up. Roast until chicken is browned and cooked through, about 50 mins.

This is so easy and delicious! You could even do more potatoes if you have some hearty eaters or want to have some leftovers.

I am thinking of getting a subscription to the mag, it has some great recipes in it!

p.s. I hope to have a post with a giveaway on Friday! I will keep you posted!
Happy Monday!

Saturday, January 9, 2010

All Things New

Ok, so I thought with the new year, my blog should get a facelift. I've decided to freshen it up a bit for the new year! Let me know what you think! I haven't taken any pictures since the day after Christmas...really, I can't believe it, so I felt as if I didn't have much to talk about. But I hope to have some fun and exciting things to show in the coming days. I think I will host my very first GIVEAWAY! I am hoping to have some fun with that and maybe meet some new bloggy friends! So, come back and check it out!